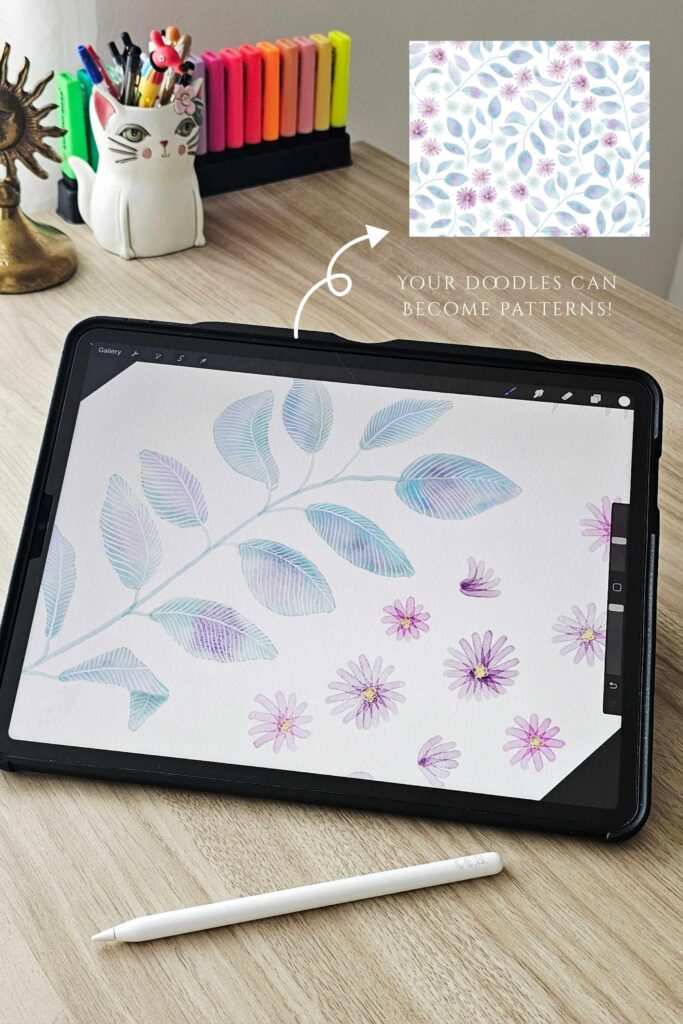
Have you ever drawn something in Procreate and thought, “I wish I could turn this into a repeat pattern for fabric, wrapping paper, or wallpaper”? You absolutely can!
In this post, I’ll walk you through how to make a seamless repeat tile in Procreate, step by step — no Photoshop needed.
If you use your ipad to draw and paint digitally I don’t believe there’s an easier way to create patterns. Being able to draw and edit everything on your ipad makes the process quick, easy and extremely flexible. I’ve created repeat patterns while travelling, waiting for an appoinment or just simply sitting in bed. I first learned this method from the Spoonflower blog, and it completely changed how I design. I’ve since used it for my own pattern collections and even created a video tutorial — if you prefer to watch instead of read, you can watch below or click here.
Don’t get me wrong, I love and use Adobe Photoshop and Illustrator as well, especially for traditionally painted motifs, but when you’re just starting out Procreate is not only easier but more cost effective. The app has a one time fee, which is crazy considering what it can do and how many professional artists use it. So if you have an ipad I hope you’ll give it a go!
What you’ll need:
- An iPad with Procreate
- An Apple Pencil
- A basic understanding of layers in Procreate
- Your design elements — for example, flowers, cats, leaves, stars, or whatever you love drawing. You can certainly draw as we go, but I find I prefer drawing the elements beforehand and importing them onto my canvas in separate layers when I’m ready to begin.
Have you ever drawn something in Procreate and thought, “I wish I could turn this into a repeat pattern for fabric, wrapping paper, or wallpaper”? You absolutely can! In this post, I’ll walk you through how to make a seamless repeat tile in Procreate, step by step — no Photoshop needed.
If you use your ipad to draw and paint digitally I don’t believe there’s an easier way to create patterns. Being able to draw and edit everything on your ipad makes the process quick, easy and extremely flexible. I’ve created repeat patterns while travelling, waiting for an appoinment or just simply sitting in bed. I first learned this method from the Spoonflower blog, and it completely changed how I design. I’ve since used it for my own pattern collections and even created a video tutorial — if you prefer to watch instead of read, you can watch below or click here.
Don’t get me wrong, I love and use Adobe Photoshop and Illustrator as well, especially for traditionally painted motifs, but when you’re just starting out Procreate is not only easier but more cost effective. The app has a one time fee, which is crazy considering what it can do and how many professional artists use it. So if you have an ipad I hope you’ll give it a go!
What you’ll need:

- An iPad with Procreate
- An Apple Pencil
- A basic understanding of layers in Procreate
- Your design elements — for example, flowers, cats, leaves, stars, or whatever you love drawing. You can certainly draw as we go, but I find I prefer drawing the elements beforehand and importing them onto my canvas in separate layers when I’m ready to begin.
Step 1: Setup your canvas
- Start by creating a square canvas, such as 3000 × 3000 pixels at 300 dpi (as a minimum).
This makes your repeat pattern easier to manage and high enough quality for printing. - Import your elements onto your canvas in separate layers.
- Then go to Actions (little wrench sign), select Canvas, toggle on the the Drawing Guide and click Edit Drawing Guide. Increase the Grid Size, Thickness and Opacity to the maximum. This will allow you to see the center lines of the canvas.
Step 2: Designing the pattern’s edges
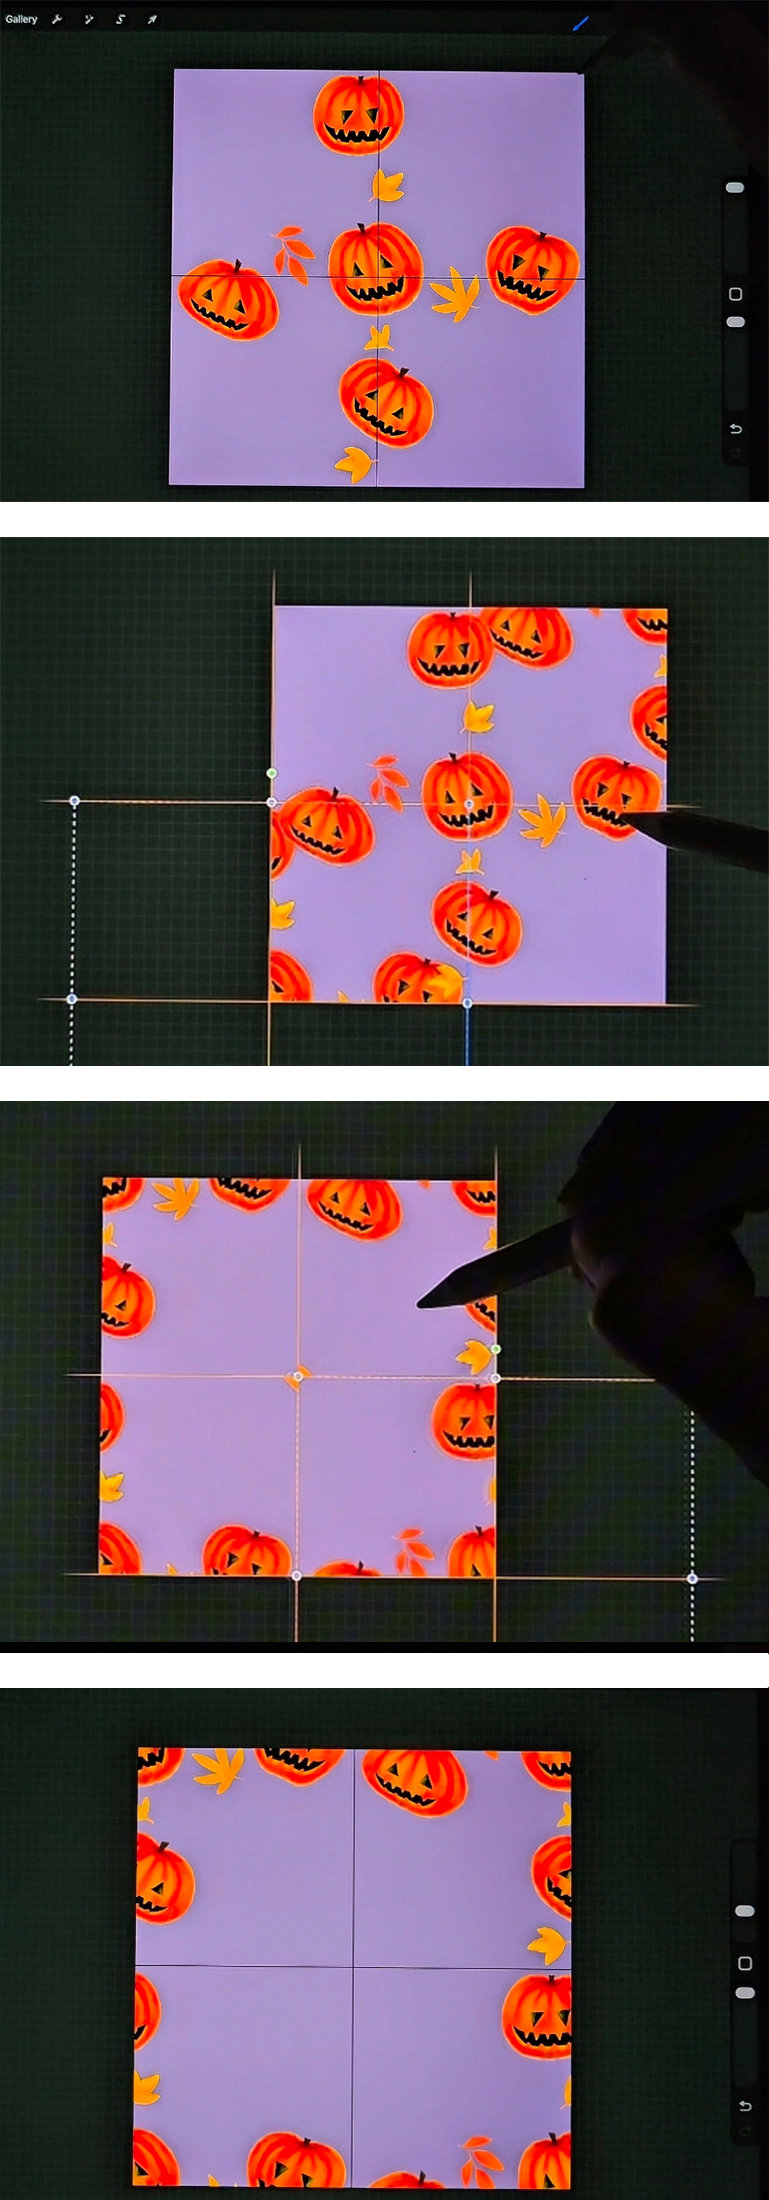
- Arrange your elements in a way that they sit on/overlap the horizontal and vertical guidelines. This step takes a bit of practice — you want to avoid leaving large empty spaces near the lines, but also be careful not to arrange your elements too evenly, or your final repeat pattern may look too structured or grid-like. These lines will create the edges of your pattern and you won’t be able to add to this area later. Make sure your elements don’t touch the edges.
- Once you’re happy with the look, select each element, group them together and then duplicate the group. We need to have all our motifs on one layer before moving on so go to the duplicated group and merge all elements together. Leave the other group untouched but turned off, we’ll use this later to take the elements from to complete the rest of our pattern.
- Move the layer with the merged design out of the group, then delete the empty group.
- Making sure your design layer selected, place a small block of colour in each corner of your canvas so there’s colour reaching all four edges. This helps Procreate “see” the whole canvas when we duplicate it. It might seem like a tiny step, but it’s an important one!
- Duplicate the layer 3 times, so you have 4 layers in total. Then click the Transform tool (little cursor sign), make sure it’s set to Uniform, click Snapping and toggle on Snapping. (Important note: never tap outside your canvas when a layer is selected! Doing so will get the whole layer Nudged in that direction by one pixel, which will cause problems. To close an opened window, simply click the tool you used on the upper left corner again. )
- We’re ready to move our layers into place! With one of the four layers selected, slide the full sized image outward until the outer edge sits directly in the center. You’ll see the horizontal and vertial guidelines turning orange when the alignment is perfect. Make sure you don’t change the size of the layer when moving it (don’t grab it by the blue dots). Repeat this step with the remaining 3 layers until you have the edges filled with pattern and the center seems empty. Now merge the four layers together. That’s the edges of our repeat done!
- Delete the little mark we made earlier from the middle, and turn off Snapping before moving on.

Step 3: Designing the centre
- Now the fun part! you can go back to the group with the elements we saved earlier and use those elements to populate the center of your pattern. Take the time to play around, try different angles to make sure your pattern looks pleasing. We’re going to merge/flatten this group as well so it’s a good idea to create a duplicate group when you’re finished, so if you need to make adjustments later, you have access to your motifs individually.
- Once you duplicated the group, merge all the layers that form the center of your pattern, then merge that with the layer that contains the edges. Tadaaa! What you see is your repeat pattern! Now we have to test it!
Step 4: Testing your pattern
- Turn on the Snapping tool again and duplicate this layer 4 times, so you have 5 copies in total. 4 we’ll use to test our pattern and/or create a smaller scale version and one will be your finished design. Turn the 5th copy off, so it doesn’t interfere with our work.
- Now we’re going to do the opposite of what we’ve done earlier. With one of the layers selected click Transform and grab the little blue dot in one of the corners and move it to the centre (essentially shrinking the whole layer into one of the quarters) until you see the orange lines. Select the next layer and repeat this 3 times.
- If you’ve done everything right you should see how neatly your pattern repeats across the lines. Go back to Actions (wrench sign) and toggle off the drawing guide. Zoom in to see if there are any gaps. If there are, you might have nudged a layer before working with it so you’ll have to do a little fault finding. It’s best to go back and repeat the steps above. If you see no lines, you did good!
- Merge the four layers into one if you want a smaller scale version of your pattern, otherwise you can just go back to the original one (the 5th we turned off before testing) and save that.
- Export your design as PDF to avoid phantom lines. And you’re done! You’ve made a seamless repeat pattern! Use it in your Etsy shop, create custom items for yourself or just add it to a growing portfolio!

Once you’ve gone through this process yourself, you’ll see how simple it really is — it just takes doing it once or twice for everything to click. After that, the possibilities are endless! You can turn your repeat patterns into custom mugs, fabrics for baby clothes, hand towels, or even wrapping paper for birthdays and Christmas (how fun would it be to wrap gifts in your own art?!). You could even design your own wallpaper! It’s such a magical feeling seeing your illustrations come to life on real products — all starting from a single seamless tile you created in Procreate.
If you give this technique a try, tag me on Instagram — I’d absolutely love to see what you create!
And if you’d like more creative tutorials, tips, and behind-the-scenes stories, you can join my newsletter here — I share lots of inspiring goodies to help you grow your art journey.
Thank you for joining me today, if you have any question or feedback feel free to leave a comment.
Happy designing!
